Installing and Controlling Thermo Scientific Devices
![]() Thermo Scientific Accela Autosampler
Thermo Scientific Accela Autosampler
|
Device Type: |
|
|
Device Driver: |
Thermo Scientific: Accela Autosampler |
|
Hardware Options |
The Accela autosampler was tested with firmware version 2.15. |
|
Restrictions:
|
The following options are not supported:
|
What is required?
|
License: |
Timebase Class 1 |
|
Windows Firewall Settings: |
For the Windows Firewall settings that are required for the Windows XP, Windows Vista and Windows 7 operating system, respectively, refer to |
|
To control the instrument, use the Thermo_Accela_Autosampler.pan from the |
Hardware Installation
For details how to connect the autosampler via LAN and the required cables, refer to ![]() Thermo Scientific Accela Autosampler and PDA: LAN Connection.
Thermo Scientific Accela Autosampler and PDA: LAN Connection.
For an overview of how the autosampler can be used in an Accela system, refer to ![]() Thermo Scientific Accela System: Overview.
Thermo Scientific Accela System: Overview.
If you want to use the autosampler in an Accela system with hardware synchronization, refer to ![]() Hardware Synchronization with Accela Autosampler.
Hardware Synchronization with Accela Autosampler.
If you want to use the autosampler in an Accela system with Chromeleon inject response signal synchronization, refer to the description below.
To connect the Synchronization Cable
As opposed to signal transmission via the device status, communicating the injection signal via COM port using the synchronization cable guarantees exact synchronization timing between sample start and recording time and thus ensures higher reproducibility of retention times in resulting chromatogram peaks.
The following is required:
Synchronization cable (Dionex part no.: 8914.0162) to allow enhanced injection synchronization.
A free COM port to connect the Synchronization cable.
![]() Caution:
Caution:
Disconnect the System Interconnect Cable from all Accela modules and verify that the Start and Stop inputs are not connected when running the autosampler without hardware synchronization between the Accela modules in a system controlled by Chromeleon. Otherwise, Chromeleon will not be able to perform synchronization between modules.
The Dionex synchronization cable is an optional accessory required for realizing enhanced synchronization timing between the Accela autosampler and Chromeleon. Connect the synchronization cable between the autosampler and the PC as follows:
Plug the 9-pin D-Sub (female) connector of the synchronization cable into the COM port of the PC. If the PC does not provide a COM port, use a serial interface card (Meilhaus) instead. Note: Connection via UCI COM port is not possible. For more information about Meilhaus cards available from Thermo Scientific Dionex , refer to ![]() Installing the Serial RS-232 Interface Card (Meilhaus).
Installing the Serial RS-232 Interface Card (Meilhaus).
Plug the other end of the synchronization cable into the left-most 8-pin socket at the rear panel of the autosampler (see figure of the rear panel connectors below).
![]() Note:
Note:
In the Server Configuration, the option Inject Sync must be set to COMx (this is the default setting). For details refer to section Software Installation below.
Software Installation
In the Chromeleon Server Configuration, add the Driver to a timebase. For details, see ![]() Adding, Configuring or Deleting Devices. After you add the driver to the timebase, the Configuration dialog or wizard opens automatically.
Adding, Configuring or Deleting Devices. After you add the driver to the timebase, the Configuration dialog or wizard opens automatically.
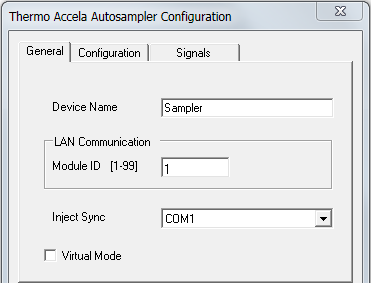
On the General tab page specify the following settings:
Select the Module ID which is required to specify the network IP address of the autosampler. The IP address is in the format 172.16.xx.111, whereby 'xx' corresponds to the module ID of the autosampler.
Note: The module ID must match the rotary switch settings at the rear panel of the autosampler. If you need to change the switch settings, refer to ![]() Thermo Scientific Accela Autosampler and PDA: LAN Connection.
Thermo Scientific Accela Autosampler and PDA: LAN Connection.
Under Inject Sync, select the COM-Port to which the synchronization cable is connected (usually COM1). This is the recommended setting as it allows enhanced injection synchronization via the synchronization cable.
If you need to deactivate the enhanced synchronization function, click the arrow next to Inject Sync and select Software. In this case, no synchronization cable is required and Chromeleon retrieves the injection signal from the device status.
Note: Changing the Inject Sync setting to Software may lead to a time delay between sample start and recording time resulting in a lower reproducibility of retention times in chromatogram peaks.
On the Signals tab page, verify that all check boxes except the Inject Output Active High check box remain cleared.
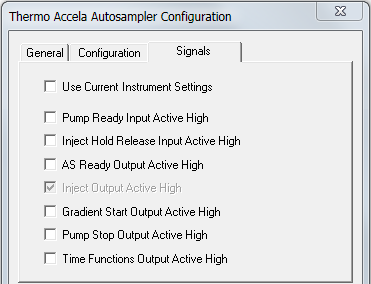
Select the desired settings on the remaining Configuration tab page. For information about the settings on a page, click the Help button or press F1.
Further Information
For detailed installation instructions, refer to the operating instructions for the instrument.
![]() Troubleshooting for USB and TCP/IP Connections
Troubleshooting for USB and TCP/IP Connections
![]() Thermo Scientific - for an overview of the different Thermo Scientific/Thermo Finnigan/ThermoQuest/TSP instruments that can be controlled by Chromeleon.
Thermo Scientific - for an overview of the different Thermo Scientific/Thermo Finnigan/ThermoQuest/TSP instruments that can be controlled by Chromeleon.