The Datasource
Top-level directories in the directory structure of the Browser are referred to as Datasources. The tool for datasource handling is the Browser. Each datasource is based on a separate database. When setting up a datasource, a path to an existing database is entered or a new database is created.
To create a datasource
Select Datasources... on the File menu.
For more information about the required steps, refer to ![]() Setting up a Datasource in the Administrator Help section.
Setting up a Datasource in the Administrator Help section.
The Browser indicates only the name of the datasource, but not the name of the underlying database. The type and number of the datasources visible to the user determine which data that can be accessed by the user. The advantages are as follows:
Users access all data in the same way. They do neither have to worry about the data’s actual storage location on the network nor do they have to enter the entire path. The location is specified when the datasource is created.
Each user can take advantage of a database without having to deal with special database programs.
Database Formats of a Datasource
Chromeleon supports several database formats. In addition to the most frequently used Access database format (mdb container), Chromeleon’s ODBC Capability allows handling SQL ("Structured Query Language") and database formats, such as Oracle and SQL servers. "Old" GynkoSoft directories ("drives") and third-party data can be displayed as if they were datasources with an underlying database. Different icons allow easy identification of GynkoSoft and Chromeleon:
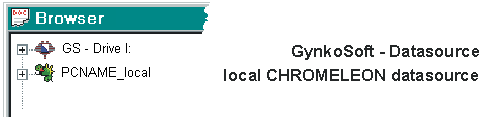
When Chromeleon is installed, a default datasource is automatically created on each client PC. The datasource name is the computer name (assigned during the installation under Windows) plus _Local. In this way, each user has a separate datasource in which (s)he can store his(her) "personal" results and data. For single systems and for users who do not have additional access rights on a network, this is the only way to store their data. The raw data of manually performed analysises are stored in this datasource, also. Therefore, do not delete the <PC NAME_Local> datasource.
Directory Structure of a Datasource
Each datasource can have any number of subdirectories organized in a hierarchical structure. To create a subdirectory, select the datasource in the Browser, and then select New Directory on the File menu. The data tree structure is similar to the well-known Windows data system.
![]() Caution:
Caution:
Actions performed in the Browser, for example, creating datasources or directories, require complex operations below the user interface. They are different from actions in the Windows Explorer and therefore, they should not be performed from the Windows Explorer. The representation of directories and data differs considerably from the Windows Explorer, also.
Do not use special characters (such as the umlaut) for new directory names or sequences. This may cause problems , for example in Novell networks.
See the image below for examples of datasources and their different directory structures:
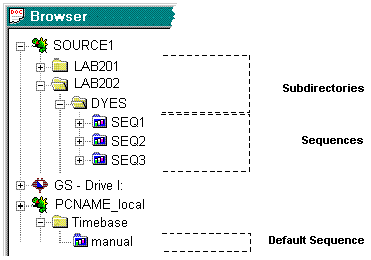
The SOURCE1 datasource has three subdirectories: LAB201, LAB202, and DYES. The DYES directory contains three Sequences: SEQ1, SEQ2, and SEQ3.
The default PC Name_local datasource has one subdirectory. The name of the subdirectory corresponds to the name of the timebase installed on this computer. The default sequence (named manual) is located in this subdirectory.
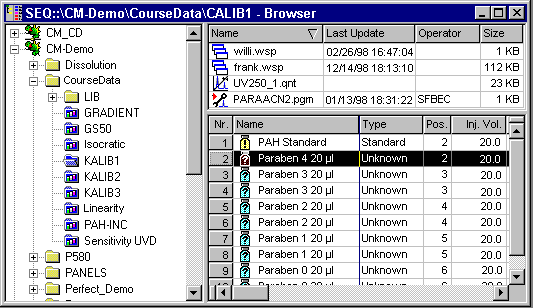
When a sequence is selected, its "inner life" is visible on the right Browser pane: file structure (control Program (![]() ), Quantification Method (QNT Method) (
), Quantification Method (QNT Method) (![]() ), Report Definition Files (RDFs), etc.), sequence information, and samples (standard samples (
), Report Definition Files (RDFs), etc.), sequence information, and samples (standard samples (![]() ), and unknown samples (
), and unknown samples (![]() ), etc.). For information, refer to Data Management
), etc.). For information, refer to Data Management ![]() The Browser. For information about the functions and significance of sequences, refer to the Samples and Sequences section; especially, refer to
The Browser. For information about the functions and significance of sequences, refer to the Samples and Sequences section; especially, refer to ![]() The Sample List (Sequence).
The Sample List (Sequence).
Drag & Drop allows you to move subdirectories, sequences, and chromatographic methods both in a datasource and between datasources of different types. Note that the items are copied and that this may change the underlying database. If you want to actually move a sample, first copy the sample to the new location, and then delete the original sample in the Browser.
![]() Caution:
Caution:
Perform drag & drop operations only in the Browser. Performing these operations outside Chromeleon, for example, in the Windows Explorer, will result in the loss of data.
Locking Datasources, Directories, and Sequences
To protect data and results, you can lock datasources, directories, or sequences. It is not possible to modify Locked objects or any object under the locked one. For example, if a datasource is locked, all subdirectories and all sequences therein are locked as well. Locked objects are identified in the Browser by the red lock on the corresponding icon (![]() ).
).
To lock an object
Select the object in the Browser.
Select Properties on the context menu.
Select the Locked check box.
To remove the lock, return to the Properties dialog box and clear the Locked check box.
![]() Note:
Note:
Locking and sharing objects is subject to access control. (The Administrator Help section provides more information; refer to Software Installation and Communication ![]() Access Control.) Only users who have the corresponding privilege can lock and/or share objects.
Access Control.) Only users who have the corresponding privilege can lock and/or share objects.
In addition to locking datasources and directories by the Locked check box, access to these items can be controlled by adding them to Access Groups or removing them.
Select the datasource or directory in the Browser.
Select Properties on the context menu.
On the Access Control tab page, define the Access Group assignment, using the Add and Remove buttons.
Only users who are members of an Access Group listed in the Access Groups are authorized to access datasources and directories.