Installing and Controlling Thermo Scientific Devices
![]() Thermo Scientific Accela Pump
Thermo Scientific Accela Pump
|
Device Type: |
Quaternary low-pressure gradient pump with built-in degasser |
|
Device Driver: |
Thermo Scientific: Accela Pump |
|
Hardware Options Supported: |
The following pump types are supported: Accela pump (high and low pressure modes) Accela 600 pump (optional: leak sensor, purge pump) Accela 1250 pump (optional: leak sensor, purge pump)
Support of the Accela 600 and 1250 Pumps is available starting with the SR11 Driver Update that provides extended Accela system support. The Accela pump was tested with firmware version 12.47c. The Accela 1250 pump was tested with firmware version 23.67e. |
|
Restrictions: |
Firmware download cannot be done via Chromeleon. Instead, use the Thermo Scientific download tool provided with the XcaliburTM software. |
What is required?
|
License: |
Timebase Class 1 |
|
Connection: |
A free USB port and the following cable are required:
It is not possible to control the pump via an RS-232 connection. |
|
To control the instrument, use the Thermo_Accela_Pump.pan from the Dionex Templates\Panels\LC_Other folder in the Browser. |
Hardware Installation
First, install the Chromeleon software, and then connect the instrument to the USB port on the Chromeleon server PC.
Use a standard USB cable to connect the pump to the IPC.
Also refer to ![]() Connecting Dionex Devices via USB.
Connecting Dionex Devices via USB.
For an overview of how the pump can be used in an Accela system, refer to ![]() Thermo Scientific Accela System: Overview.
Thermo Scientific Accela System: Overview.
If you want to use the pump in an Accela system with hardware synchronization and an Accela autosampler, refer to ![]() Hardware Synchronization with Accela Autosampler.
Hardware Synchronization with Accela Autosampler.
If you want to use the pump in an Accela system with hardware synchronization and an Accela Open autosampler, refer to ![]() Hardware Synchronization with Accela Open Autosampler.
Hardware Synchronization with Accela Open Autosampler.
If you want to use the pump, for example, in a system with a different autosampler using Chromeleon inject response signal synchronization, refer to the description below.
Software Installation
![]() Caution:
Caution:
Disconnect the System Interconnect Cable from all Accela modules and verify that the Start and Stop inputs are not connected when the Chromeleon synchronization cable is used to connect the autosampler and the Chromeleon PC. . Otherwise, Chromeleon will not be able to perform synchronization between modules.
In the Chromeleon Server Configuration, add the Driver to a timebase. For details, see ![]() Adding, Configuring or Deleting Devices. After you add the driver to the timebase, the Configuration dialog or wizard opens automatically.
Adding, Configuring or Deleting Devices. After you add the driver to the timebase, the Configuration dialog or wizard opens automatically.
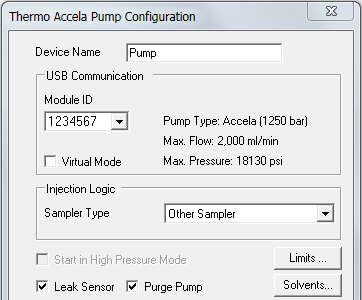
On the Pump Configuration tab page, specify the following settings:
Select the Module ID (USB adress) of the pump.
(If option is available) Under Injection Logic, select Other Sampler.
Choose the installed pump options. For information about the other settings on this page, click the Help button or press F1.

Further Information
For detailed installation instructions, refer to the operating instructions for the instrument.
For troubleshooting information, refer to ![]() Troubleshooting for USB and TCP/IP Connections.
Troubleshooting for USB and TCP/IP Connections.
For an overview of the different Thermo Scientific/Thermo Finnigan/ThermoQuest/TSP instruments for which device drivers are available in Chromeleon, refer to ![]() Thermo Scientific.
Thermo Scientific.