Installing and Controlling Third-Party
Devices
![]() Agilent 6890 GC: Installation
Agilent 6890 GC: Installation
Device Type: |
Gas chromatograph |
Device Driver: |
Agilent or HP: 6890 Gas Chromatograph |
Supported Hardware Options:
|
|
Firmware Requirements: |
When using a 7693 ALS GC autosampler, the following minimum firmware versions are required:
When using an injector supporting the Fast Multiple Injection (TOWER) option, the following minimum firmware version is required:
|
Restrictions: |
Chromeleon supports the Autozero command for compatibility reasons. You cannot execute the Autozero command from the command interface on the GC. Execute the command via the device keypad, if necessary. The following limitations apply to the 7693 ALS autosampler:
|
Hardware Installation
Device Connection: |
For information about how to connect the 6890 GC, refer to:
|
Device Settings: |
(Also, refer to the Site Preparation and Installation Manual shipped with the GC.)
The communication settings must be as follows: Baud rate 9600 Handshake XonXoff Parity None Data bits 8 Stop bits 1 End of command LF To change the settings, move the < selection to the line you want to edit, and then click Mode/Type. Now, move the < to the required value and press <Enter>. |
Device Settings: |
For information
about the device settings required for LAN control, refer to |
Device Settings: |
Injection range Ensure the injection range is set correctly, depending on the GC and autosampler in use. Note that not all of the possible GC-autosampler combinations are mentioned below. If in doubt, please contact your Agilent or Thermo Fisher Scientific Service Representative for more information.
7673 on the 6890 GC (The following applies to the 6890 GC, but not to the 6890N GC.): On the 6890 GC, check whether an injection range is set (Nanoliter adapt: On/Off under [Config] / [Front Injector]). If it is, verify that the same injection range is set both on the device and in Chromeleon. If the injection ranges are different, the actual injection volume will be different from the set volume. Set the injection volume in Chromeleon via the following sampler command: Nanoliter = On / Off.
7683 on the 6890 GC 7683 on the 6890 GC: On the 6890 GC, set the injection range to Nanoliter adapt: On under [Config] / [Front Injector]. On the Sampler page in the Chromeleon Server Configuration, select 7673 ALS from the drop-down list. 7683 on the 6890N GC: On the 6890N GC, set the injection range to Nanoliter adapt: On under [Config] / [Front Injector]. On the Sampler page in the Chromeleon Server Configuration, select 7683 ALS from the list.
7693 on the 6890 GC and 6890N GC: The injection volume can be set in the range from 1%–50% of the syringe volume (in increments of 1%).
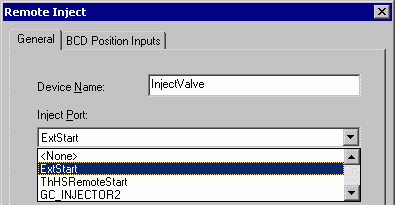
Enabling the Start key on the GC Enable the Start key on the GC if you want manual injections to start the run and generate an inject response from the instrument's panel: In the Server Configuration program, add a Remote Inject driver to the headspace timebase. (Select Add Device on the Edit or context menu, and then select Generic from the Manufacturers list box and Remote Inject from the Devices list box.) On the General tab page, select ExtStart from the Inject Port drop-down list box:
Issue an Inject command to enable the key: [] 18:00:34 0.000 InjectValve.Inject [Message] 18:00:34 0.000 {InjectValve} Waiting for inject response on ExtStart. [Message] 18:00:41 0.000 {InjectValve} Got inject response.
For Chromeleon versions up to 6.70 (including) the AGP Remote Start line on the GC was enabled automatically upon connect. From Chromeleon 6.70 Service Pack 1 on, the line is disabled (except during the Inject command). Therefore, you have to modify programs that include a Wait GC.RunState = Running command to synchronize injections with an external autosampler. (It is not necessary to change programs in which Remote Inject is set to ExtStart.) The new method will usually enhance the reproducibility of the retention times. |
Software Installation
Install the Device Driver in the Chromeleon Server Configuration:
Start the Chromeleon server.
Start the Server
Configuration program. (For more information about the program,
refer to ![]() The Server Configuration Program.)
The Server Configuration Program.)
Add the gas chromatograph
to the timebase. For
details about how to add timebases and device drivers to the Server
Configuration, refer to ![]() Adding, Configuring or Deleting Devices.
When you add a driver to the timebase, the configuration dialog or
wizard opens automatically. For information about the settings, click
the Help button on a page or press F1.
Adding, Configuring or Deleting Devices.
When you add a driver to the timebase, the configuration dialog or
wizard opens automatically. For information about the settings, click
the Help button on a page or press F1.
![]() Tip:
Tip:
On the Select configuration mode page, enable Get configuration from the instrument. Click Next> to download the hardware configuration from the instrument. (This may take some time.) After the download is complete, the HP Instrument configuration page indicates the downloaded configuration.
Chromeleon does not read the autosampler and syringe types from the instrument. Therefore, be careful to select the appropriate settings on the Sampler page. When using a 7683 autosampler on the 6890 GC (not on the 6890N GC), select 7673 ALS from the Installed drop-down list.
To control the 6890 GC, connect one of the following Control Panels in the Chromeleon client to the corresponding timebase: HP6890.pan or HP6890 Single Injector.pan (if there is just one injector).
Troubleshooting
When you exchange the hardware, for example after hardware repairs, make sure to retrieve the configuration of the device afterwards to avoid system incompatibilities. Otherwise, the Audit Trail will report an error message.
To retrieve the configuration, do the following:
Remove the driver from the timebase and then add it again.
On the Select configuration mode page, click Get configuration from the instrument. The configuration will then be downloaded from the respective module to the Server Configuration program.
For further troubleshooting information, also
refer to ![]() Agilent 6890 GC: Troubleshooting.
Agilent 6890 GC: Troubleshooting.
If you have special questions, please contact Dionex Service.
Further Information
For more installation details, refer to the 6890 GC manual.
For information about the requirements when installing the 6890 GC via a LAN or RS-232 connection, refer to:
![]() Agilent
6890 and 6850 GCs: LAN (Overview)
Agilent
6890 and 6850 GCs: LAN (Overview)
![]() Agilent
6890 and 6850 GCs: RS-232 (Overview)
Agilent
6890 and 6850 GCs: RS-232 (Overview)
For information about how to configure the
6890 GC for dual operation, refer to ![]() Agilent 6890 GC: Dual Operation.
Agilent 6890 GC: Dual Operation.
For information about how to connect an autosampler
to the 6890 GC, refer to ![]() Agilent 7673 or 7683 Autosampler on the
6890 GC.
Agilent 7673 or 7683 Autosampler on the
6890 GC.
For an overview of the different Agilent/HP
instruments for which device drivers are available in Chromeleon, refer
to ![]() Agilent (formerly HP).
Agilent (formerly HP).