![]() Creating New Users/Deleting or Modifying Existing Users
Creating New Users/Deleting or Modifying Existing Users
You can create new users and modify or delete existing users in the Users dialog box of the ![]() User Manager (CmUser Program). The Access Groups list and the Privilege Groups list indicate the Access Groups and Privilege Groups to which the selected user belongs. The tabs in the bottom part of the window indicate the Privileges (User Rights) that the selected user has in the corresponding Privilege Group. You can change these rights in the Privilege Group window.
User Manager (CmUser Program). The Access Groups list and the Privilege Groups list indicate the Access Groups and Privilege Groups to which the selected user belongs. The tabs in the bottom part of the window indicate the Privileges (User Rights) that the selected user has in the corresponding Privilege Group. You can change these rights in the Privilege Group window.
Creating a New User
Click New to create a new user. On the User Data tab page, enter the user’s ID, name, and job title:
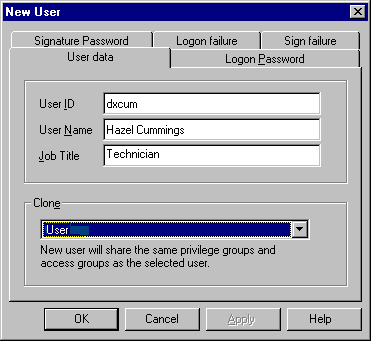
In general, the name is the full name of the person and the User ID is a short form of the name. Both a User ID and a Password are required to log on to the system.
The User ID must start with an alphanumerical character. This may be followed by up to 29 alphanumerical or numerical characters, as well as the underscore ("_").
The User ID for Chromeleon administrators is CMADMIN. Administrators have all privileges assigned and may access all Groups.
You can create additional administrators. Select the User can administer user database box to allow the user to manage the CmUser Database. Administrators with a User ID other than "cmadmin" have only the privileges that have been assigned to them. They are members of the Access Group(s) they have been explicitly assigned to, but no others. However, they can unlock Chromeleon clients and delete history entries from Chromeleon datasources.
In the Clone field, open the combo box by the arrow. Select one of the registered users to apply this user’s Access Group and Privilege Group assignments to the new user.
On the Logon Password tab page, enter the logon password that will allow the new user to open the Client and the Server Configuration:
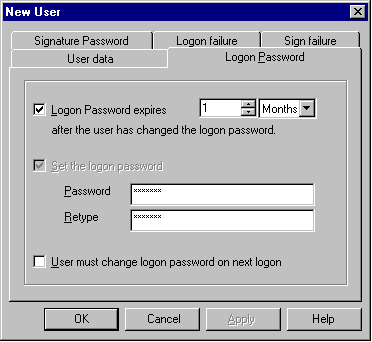
In addition, specify for how long the password is valid and whether it has to be changed the next time the user logs on.
![]() Tip:
Tip:
For security reasons, the number of characters for the old password is not displayed when you reopen the tab page. Nevertheless, the password was saved.
On the Signature Password tab page, enter the password required to sign sequences (see Electronic Signature).
![]() Note:
Note:
If LDAP logon is enabled on the ![]() LDAP Logon tab page, the options on the Logon Password and Signature Password tab pages are disabled.
LDAP Logon tab page, the options on the Logon Password and Signature Password tab pages are disabled.
On the Logon failure tab page, define the conditions for logon failure. Select the Limit logon retries check box and specify the maximum number of logon attempts allowed:
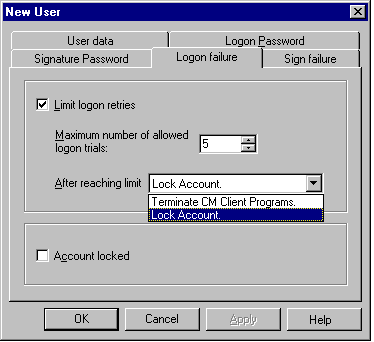
In the After reaching limit field, specify what happens when the maximum number of logon attempts is reached. If the number of failed attempts reaches the limit and if Terminate CM Client Programs was defined, the Chromeleon client programs (Chromeleon, Server Configuration, and CmUser) are aborted. If Lock Account was defined, the account is locked.
 Tip:
Tip:
If the number of failed logons reaches the limit, either the User Manager is aborted or the account is locked and all administrators are denied access. If the next to last permitted logon fails, a message appears, warning that the CmUser database itself will be locked if the next logon attempt fails. To avoid having the CmUser database locked (which would prevent access to the database by all administrators), enter the password only if you are sure that it is correct! If you enter an invalid password, you will not be able to open the database. If this occurs, contact your Dionex Service Representative for assistance.
Use the Account locked option to directly lock a user account. If the user subsequently tries to log on, a message appears stating that the Account is locked and advising the user to contact the administrator.
On the Sign failure tab page, specify how many times the user may try to enter the correct password. If an incorrect password is entered more often than specified here, the signature is locked and no more attempts are permitted.
Modifying an Existing User
Select the user name from the list and click Edit User to open the Edit User <User Name> dialog box. (Except for the name, this dialog box is identical to the New User dialog box.) The dialog box lists the entries made when the user was created. Change the entries as required.
The user can change the password assigned by the administrator in the Logon dialog box at any time. In addition, the password can be overwritten in the CmUser dialog box.
Deleting Users
Select the user name and click Delete. Click Yes to confirm your selection and to delete the user.
Also, refer to:
![]() Creating New Access Groups/Deleting or Modifying Existing Access Groups
Creating New Access Groups/Deleting or Modifying Existing Access Groups
![]() Creating New Privilege Groups/Deleting or Modifying Existing Access Groups
Creating New Privilege Groups/Deleting or Modifying Existing Access Groups