Autosampler Control
![]() Defining Sample Positions (WPS-3000/ACC-3000)
Defining Sample Positions (WPS-3000/ACC-3000)
The autosamplers are designed to enable easy sample loading. The carousel consists of three segments, each of which is assigned a color (green, red or blue). Each segment can hold a sample container (i.e., a vial rack, well plate or deep well plate).
![]() Tip:
Tip:
For information about which sample container types are supported and about how to install and load them, refer to the Operating Instructions of the autosampler.
During initial installation of the autosampler, the standard configuration of the carousel is specified on the Segments / Pump Link page in the Chromeleon Server Configuration program. If you later install different sample containers, you have to adapt the settings in Chromeleon accordingly. This can be done either on a Control Panel or from the Commands dialog box (F8). Always make sure that the configuration settings in Chromeleon match the sampler container actually installed in the carousel. Otherwise, the needle might be damaged.
To configure the rack or well plate in Chromeleon
Click ![]() to open a default panel tabset.
to open a default panel tabset.
On the Sampler page, select the installed sample container from the lists under Tray Control.
- or -
Open any control panel and connect it to your timebase.
Press F8 or select Command on the Control menu.
Click the plus sign next to Sampler to display the parameters and commands underneath.
Select RedTray, GreenTray, or BlueTray, and then select the installed sample container from the list.
![]() Tip:
Tip:
Adapt the needle height via the SampleHeight parameter if necessary. For details, refer to ![]() Autosampler Control: Defining the Needle Height.
Autosampler Control: Defining the Needle Height.
To specify the sample position in the sequence or for direct injection
Before an inject command, you must specify the sample position. (For details, refer to ![]() Autosampler Control: Injecting a Sample.)
Autosampler Control: Injecting a Sample.)
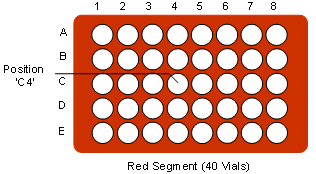
The individual segments in the carousel are color-coded R for red, G for green, and B for blue. The character defining the segment that holds the sample container (R, G, or B) comes first, followed by a letter and a digit, as in a system of coordinates. The letters specify the individual rows from the inner to the outer row. The digits specify the position of the sample in the row. The numbering is from the left to the right, as indicated on the racks. Thus, the exact sample position for a vial in the vial rack that is positioned in the red segment in the fourth hole in the third row is: RC4. This also applies for well numbering.

When specifying the location for the 10 mL vials, the character defining the segment that holds the vial (R, G, or B) comes first, followed by a digit (1-5). The exact location for a vial that is in the third hole in the blue segment is therefore: B3.
To check the sample status
You can display the vial positions for the selected sequence and check the Status of samples. For details, refer to ![]() Rack Preview.
Rack Preview.
For details about how to define relative sample positions, for example for prep vials, refer to