Autosampler Control
![]() Defining the Needle Height and Puncture Depth (WPS-3000 and ACC-3000)
Defining the Needle Height and Puncture Depth (WPS-3000 and ACC-3000)
The needle height defines how deep the needle descends into the sample container for sampling. You can define the needle height when you create a program with the Program Wizard or via the related commands in the Commands dialog box (F8). For information about how to set the correct needle height for the different autosampler types, see the related sections below.
Defining the Needle Height for the WPS-3000SL, WPS-3000RS and WPS-3000TXRS (firmware version 2.00 and later) and ACC-3000
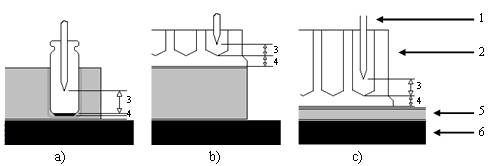
For these autosamplers, the SampleHeight parameter (ReagentLiquidHeight for 10 mL vials in the 5-position vial holder) specifies the distance (in mm) between the bottom of the sample container (well plate, deep well plate, or vial), as measured from the interior, and the tip of the needle. This value defines how deep the needle descends into the sample container for sampling.
However, the SampleHeightOffset_XX and the DeepWellAdapterHeight parameter need to be set to the respective values of the sample container and well plate adapter, otherwise the SampleHeight parameter will not reflect the actual distance between the interior bottom of the deep well plate and the tip of the needle.
![]() Note:
Note:
The property DeepWellAdapterHeight can only be set with firmware version FW 4.13 or later.

Setting the needle height a) for a standard vial, b) for a normal well plate, and c) for a deep well plate
No. |
Description |
1 |
Needle |
2 |
Sample container |
3 |
Distance between the tip of the needle and the bottom of the sample container, as measured from interior (SampleHeight/ReagentLiquidHeight) |
4 |
Offset value for the bottom height (SampleHeightOffset_XX/BottomHeightTray) |
5 |
Adapter (DeepWellAdapterHeight) |
6 |
Carousel |
When setting the sample height, observe the following:
With SampleHeight (ReagentLiquidHeight) = 0, the needle reaches the bottom of the sample container. However, different sample container types may have different absolute bottom heights. Thus, it may happen that the needle unintentionally hits the bottom of the sample container when switch from one sample container type to another. The needle may be damaged. The needle tip is fragile and can easily be deformed.
To be able to use the same sample height setting for all supported sample container types, default sample height offset values are available for each sample container type. According to the carousel configuration, SampleHeightOffset_XX is taken into account when the needle descends into a specific sample container. With these default values, the needle does not touch the bottom of the sample container even if SampleHeight (ReagentLiquidHeight) is set to 0 mm.
Sample Container |
SampleHeightOffset_XX [mm] |
1.2 mL vials |
SampleHeightOffset_72 = 2.0 |
2 mL vials |
SampleHeightOffset_40 = 2.0 |
4 mL vials |
SampleHeightOffset_22 = 1.0 |
10 mL vials (in tray) |
SampleHeightOffset_10 = 2.0 |
10 mL vials (in the 5-position holder) |
SampleHeightOffset_T = 1.0 |
Well plate with 96 wells |
SampleHeightOffset_96 = 4.0 |
Well plate with 384 wells |
SampleHeightOffset_384 = 3.0 |
Deep Well plate with 24 wells |
SampleHeightOffset_24deep = 2.0 |
Deep well plate with 96 wells |
SampleHeightOffset_96deep = 2.0 |
Deep well plate with 384 wells |
SampleHeightOffset_384deep = 2.0 |
![]() Note: Use
the property DeepWellAdapterHeight
to specify the height of the adapter.
Note: Use
the property DeepWellAdapterHeight
to specify the height of the adapter.
If you want to sample only once from a container, select the SampleHeight (ReagentLiquidHeight) in such a way that the needle is lowered into the sample container only as deep as required; thus, further reducing sample carry-over.
If you want to use an adapter for deep well plates (24, 96 and 384 positions) of different heights (20 - 46 mm), use the property DeepWellAdapterHeight to specify the height of the adapter. Adapters are available with different dimensions. Consider these differences when you define the needle height. The bottom heights of the deep-well adapters are 2.8, 5.8, 7.0 or 16.8 mm. The value of the DeepWellAdapterHeight needs to be adjusted to the given adapter. The following table displays recommended values for parameters SampleHeight, SampleHeightOffset and DeepWellAdapterHeight.
Part number |
Image |
Use with |
Height of the adapter [mm] |
SampleHeight [mm] |
SampleHeightOffset [mm] |
DeepWellAdapterHeight [mm] |
6820.4079 (old version) |
|
24-, 96-, or 384- well plates (34-46 mm high) |
5.8 |
2 |
2 |
5.8 |
6820.4079 (current version) |
|
24-, 96-, or 384- well plates (34-46 mm high) |
2.8 |
2 |
2 |
2.8 |
6820.4083 |
|
96-, or 384- well plates (30-36 mm high) |
7 |
2 |
2 |
7 |
6820.4089 |
|
24-, 96-, or 384- well plates (20-32 mm high) |
16.8 |
2 |
2 |
16.8 |
The DeepWellAdapterHeight property is only available in Expert mode. It cannot be set for each carousel segment (red, green or blue). Only one deep well plate type and adapter is supported.
![]() Caution:
Caution:
To avoid damage to the needle, do not set SampleHeight and SampleHeightOffset_XX (and, if applicable, DeepWellAdapterHeight) to 0 when a sample container is installed.
Defining the Needle Height for the WPS-3000PL (RS) and WPS-3000FC
For these autosamplers, three parameters specify the distance (in mm) between the bottom of the sample container (well-plate, deep-well plate, or vial), as measured from the interior, and the tip of the needle
SampleHeight
TransLiquidHeight for reagent or transport vials
FractionHeight for fractions if a WPS-3000FC or a Micro Fraction Collection Option (MFC) is installed
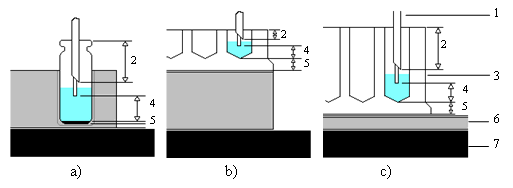
In addition, the PunctureDepth parameter is available, setting how deep the puncturer descends into the sample container (well-plate, deep-well plate, or vial), as measured from the top of the sample container. The puncture depth for the reagent and/or transport vials is set via the TransVialPunctureDepth parameter.

Setting the needle height and puncture depth a) for a standard vial, b) for a normal well plate, and c) for a deep well plate
No. |
Description |
1 |
Needle pair (puncturer and needle) |
2 |
PunctureDepth, TransVialPunctureDepth |
3 |
Sample container |
4 |
Distance between the tip of the needle and the bottom of the sample container, as measured from interior (SampleHeight/TransLiquidHeight) |
5 |
Offset value for the bottom height (SampleHeightOffset_XX) |
6 |
Adapter (DeepWellAdapterHeight) |
7 |
Carousel |
When setting the sample height, observe the following:
You should not set SampleHeight (TransLiquidHeight, FractionHeight) to 0 when a sample container is installed. When the parameter is set to 0, the needle touches the bottom of the container. The tip of the needle is fragile and may be damaged.
If you want to sample only once from a container, select the SampleHeight (TransLiquidHeight, FractionHeight) value in such a way that the needle is lowered into the sample container only as deep as required; thus, further reducing sample carry-over.
If you want to sample several times from the same container, select the SampleHeight (TransLiquidHeight, FractionHeight) value in such as way that the needle is lowered as deep as possible into the container, that is, as close as possible to the container bottom, allowing you to sample the volume almost completely.
Use the SampleHeightOffset_XX parameter to prevent the needle from touching the bottom of the sample container even if the SampleHeight is set to 0 mm. Enter the bottom height for the currently used sample container. This offset will be taken into account when the needle descends. The default offset value for the bottom height (SampleHeightOffset_XX) is set to 0.
If TransLiquidHeight is set to a small value, you may have to increase the TransVialPunctureDepth to allow the needle to descend to the bottom of the transport vial.
When setting the puncture depth, observe the following:
Select the puncture depth in such a way that the puncturer is lowered into the sample container as deep as required to pierce the septum but not that deep that contact is established to the sample.
If the value is selected too low, the puncturer will not pierce the septum of the sample container. Thus, the needle cannot enter the vial and may be damaged.
For most HPLC vials, a puncture depth of 8 mm will be sufficient to pierce the septum.