Autosampler Control
![]() Setting Up Remote Injection
Setting Up Remote Injection
If Chromeleon does not directly control the injection valve, a Remote Input (remote start) device can be set up that communicates to Chromeleon when an injection was performed. The setup procedure includes the following main steps:
Connect the remote input device via TTL or relay
Install and configure a remote inject device in the Timebase
![]() Tip:
Tip:
For the UI20, remote injection can be triggered by the remote input or by pressing the Run button on the UI20 front panel. For the DX-120, remote injection can only be triggered by the remote input. The Load/Inject button on the DX-120 front panel is disabled during remote control.
Connect the Remote Input Device (TTL or Relay Connections)
The remote input of the remote input (remote start) device must be connected via TTL or a relay to the injection valve or to another device, e.g., an Autosampler. When injection is performed, the injection valve or autosampler sends a signal to the remote input device.The remote input device then communicates this information to Chromeleon.
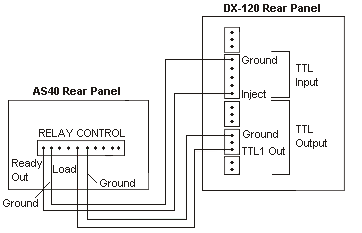
Example Connections: AS40 and DX-120
![]() Tip:
Tip:
For detailed TTL and relay connection instructions, refer to the operator's manual for each device.
The following connections allow completely automated control of the AS40 and DX-120.
Connect the Relay Control Ready Out pin on the AS40 rear panel to the Inject TTL Input pin on the DX-120 rear panel.
Connect the Ready Out Ground pin on the AS40 to the TTL Inputs Ground pin on the DX-120.
Connect the Load pin on the AS40 to the TTL 1 Out pin on the DX-120.
Connect the Load Ground pin on the AS40 to the TTL Outputs Ground pin on the DX-120.
Configure a Remote Inject Device
Open the Server Configuration.
Select the timebase in which the remote input device is configured.
Select Add Device on the Edit or context menu. The Add device to timebase dialog box appears.
Select Generic from the Manufacturers list box, and then select Remote Inject from the Devices list. Click OK.
The Properties dialog box for the Remote Inject device appears. The default device name is InjectValve. You can accept the default name or enter a different one.
From the Inject Port drop-down list, select the remote input device that was connected through TTL or relay. Click OK.
Add an Inject Command to the Program
Add the following command to the PGM File. (If you use the Program Wizard (see Control ![]() The Program Wizard), the command is added automatically).
The Program Wizard), the command is added automatically).
|
0.000 |
Inject |
|
When Chromeleon executes the program, it runs the commands that occur before the Inject command and then waits for the signal from the remote input device. A message in the Audit Trail is displayed: "Wait for inject response on remote start." When the inject signal occurs, program execution resumes.
Example PGM File: AS40 and DX-120
|
|
Data_Collection_Rate |
5.00 |
|
|
|
Pump = |
On |
|
|
|
SRS = |
On |
|
|
|
EluentPressure = |
On |
|
|
|
Column = |
A |
|
|
|
ECD_TTL_1.State = |
5v |
Note 1 |
|
|
Wait |
RinseComplete |
Note 2 |
|
-0.100 |
ECD_TTL_1.State = |
0v |
Note 3 |
|
|
|
|
|
|
0.000 |
ECD.Autozero |
|
Note 4 |
|
|
Inject |
|
Note 5 |
|
|
ECD_1.AcqOn |
|
|
|
|
|
|
|
|
10.000 |
ECD_1.AcqOff |
|
|
|
|
|
|
|
|
|
End |
|
|
Notes:
TTL Out 1 turned off.
The TTL_1 5v and TTL_1 0 v commands must be separated by one or more commands or they must occur at different times in the program.
TTL Out 1 turned on. AS40 Load Cycle starts.
Program execution waits until inject signal is received.
AS40 Ready Out signals the DX-120 Inject TTL Input. Injection occurs. Program execution resumes.