Autosampler Control
![]() Sample Position Commands (AS-AP)
Sample Position Commands (AS-AP)
The AS-AP sample carousel has three color-coded sections (red, green, and blue) that can hold three sample trays in any combination of tray types. Each color-coded section also accommodates a wedge-shaped vial holder that holds eight 10 ml vials.
![]() Note:
Note:
Before starting a program, verify that the carousel configuration in Chromeleon matches the sample containers installed in the carousel. If the settings in Chromeleon do not match the installed sample containers, the needle may be damaged. For information about how to specify the carousel configuration and define sample positions, refer to ![]() Defining Sample Positions (AS-AP).
Defining Sample Positions (AS-AP).
Fixed Sample Positions
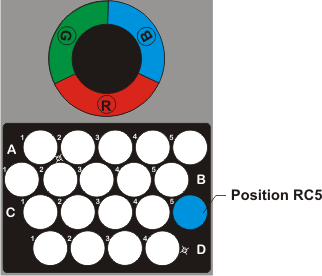
Sample positions in a vial tray or well plate tray
Positions in a vial tray or well plate consist of a three-character identifier code (for example, RC5):
The first character indicates the color of the carousel section in which the tray is installed (R for red, G for green, or B for blue).
The second character indicates the row in which the vial or well is located (A, B, C, etc.). Rows are lettered starting with A in the upper left corner and continuing down.
The third character indicates the column in which the vial or well is located (1, 2, 3, etc.). Columns are numbered starting with 1 in the upper left corner and continuing across.
For example, to sample from the tray installed in the red section, and from the vial in the third row down from the top and the fifth column across, specify RC5 (see figure below).
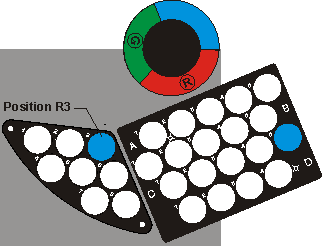
Sample positions in a vial holder
Positions in the eight-position vial holder consist of a two-character identifier code (for example, R3):
The first character indicates the color of the carousel section in which the holder is installed (R for red, G for green, or B for blue).
The second character is the numbered position in which the vial is installed.
For example, to sample from the vial installed in the third position of the red section, specify R3 (see figure below).
|
|
Sampler.Position |
R1 |
|
|
Sampler.Position |
R2 |
|
|
SSampler.Position |
R3 |
|
|
Sampler.Position |
R4 |
Reagent and wash vial positions
Positions for reagent and wash vials are valid for the entire running time of the program.
|
|
Sampler.ReagentAVial |
R1 |
|
|
Sampler.ReagentBVial |
R2 |
|
|
Sampler.ReagentCVial |
R3 |
|
|
Sampler.WashVial |
R4 |
Relative Sample Positions
Chromeleon supports sample position indexing that is relative to the position of another sample. For example, you may want to specify a relative sample position for the vial to be used for sample preparation (PrepVial). The relative position can be in a different row, in a different section, or a certain number of vials away from the current vial.
Next row: To use the corresponding vial in the next row, use the following command in the program:
|
0.000 |
Sampler.PrepVial |
= |
Sampler.Position + RB1 - RA1 |
This line specifies that the corresponding vial in the next row will be used as the mixing vial for the sample in the previous row. For example, if the sample is processed at position RB5, mixing is performed at position RC5.
Next section: You can also place the samples to derivate in one section and the reagent to be used for mixing in the corresponding vial in a different section. In this case, use the following command:
|
0.000 |
Sampler.PrepVial |
= |
Sampler.Position + GA1 - RA1 |
This line specifies that the mixing vial for the sample in the red section will be the corresponding vial in the green section. For example, if the sample is processed at position RB5, mixing is performed at position GB5.
Incrementing the positions: To specify a sample position that is a certain number of vials away from the current position, do not specify a relative sample position as in the previous examples. Instead, use the PositionCalculator property. This is important because correct position calculation depends on the installed sample container. The PositionCalculator property calculates the correct position independent of the installed sample container. The following example defines position 5 after the current position for the prep vial:
|
0.000 |
PositionCalculator |
= |
Sample.Position |
|
|
IncrementPositionCalculator By |
= |
5 |
|
|
Sampler.PrepVial |
= |
PositionCalculator |
For example, for the sample at position RB3, the mixing vial is at position RB8.
For an overview of individual commands, refer to Commands for Controlling Dionex Devices
![]() Dionex AS-AP Autosampler
Dionex AS-AP Autosampler
![]() Dionex AS-AP Autosampler: Commands for User-Defined Programs
Dionex AS-AP Autosampler: Commands for User-Defined Programs