Commands and Tips for Third-Party
Devices
![]() Waters Acquity UPLC System, 2489 UV/Visible Detector and 2998 PDA Detector:
General Tips
Waters Acquity UPLC System, 2489 UV/Visible Detector and 2998 PDA Detector:
General Tips
![]() Note:
Note:
Always turn on the Acquity system before you start the Chromeleon server.
Creating a program
Programs must be created using the Program Wizard. It is not possible to manually create a program in the Commands view using the PGM Editor.
On the File menu, click New, and then click Program File.
Select the timebase in which the Acquity system is installed.
On the Acquisition Options page, select the time when acquisition stops. Do not clear or select any of the channels/devices (settings will be ignored).
On the Waters Acquity System Driver Options page, go to the tab page for each module to select the options for the program. The tab pages link into the Waters Method Editor software.
![]() Tips:
Tips:
Click the question mark for help on the settings.
When programming steps, the Waters Method Editor software does not allow duplicate time points. However, time steps of 0.01 min are allowed.
Complete the program wizard as usual.
You can modify the program in the Device View. However, manual editing in the PGM Editor is restricted to the following modifications:
AcqOff time for each channel (end of data acquisition)
SwitchDetectorLamps On/Off (for example, to turn off lamps after acquisition)
SwitchPumpMotors On/Off (for example, to stop the flow after acquisition)
ScanStart, ScanEnd, ScanNow (Acquity FLR scan commands)
![]() Notes:
Notes:
Do not modify the start time. The Inject and AcqOn commands must be at retention time 0.000. Do not manually add or delete any channels. This will corrupt the program. Do not delete the Inject command (except when creating an emergency program).
Note that the SwitchDetectorLamps command turns the lamps of all connected detectors on or off. Detector lamps can be turned on or off separately via the Acquity Console.
The method that is sent to the Acquity system is displayed in the Chromeleon Audit Trail for each sample.
For information about how to create an emergency
program, refer to ![]() Waters Acquity UPLC System: Emergency
Program.
Waters Acquity UPLC System: Emergency
Program.
Printing the Waters method with the Chromeleon PGM
You can include a Waters method that is stored in a Chromeleon PGM in the printout of the PGM. Print preview is not supported.
Double-click the PGM file to open it in the PGM Editor (Commands View).
On the Chromeleon toolbar, click the Print button.
In the Select sheets to print dialog box, select the Waters Acquity Method check box.
In the Print dialog box, specify the print settings. Click OK to print the Chromeleon PGM/Waters method sheet.
In addition, you can include a Waters method in a report template of the Printer Layout in order to prepare it for printing.
Click the ![]() icon on the Method
toolbar to open the Printer Layout
from your currently selected view. Chromeleon automatically opens
the report template of the current sequence. Select the Load
Report Definition command on the context menu to open a specific
report template, if necessary.
icon on the Method
toolbar to open the Printer Layout
from your currently selected view. Chromeleon automatically opens
the report template of the current sequence. Select the Load
Report Definition command on the context menu to open a specific
report template, if necessary.
Add a new sheet to the
report template or select an existing sheet. For details, refer to
![]() Creating
Templates and Worksheets.
Creating
Templates and Worksheets.
Right-click in the sheet, point to Insert and click Chromeleon Report Table....
Click PGM Tables and select Waters Acquity Method from the list. The Waters method is inserted in the sheet (may take a few seconds).
Direct Control
For direct "online" control of the Acquity UPLC system, always use the Waters Acquity UPLC Console. The Chromeleon control panel can be used to monitor the parameters. You can open the Waters Acquity UPLC Console from the control panel by clicking the Launch Console button. It is not recommended (and may cause problems when working remotely) to control the instrument by opening the Waters Acquity UPLC Console from the Windows explorer.
![]() Notes:
Notes:
The Launch Console button appears dimmed if the timebase is not connected, if you do not have control over the timebase, or in Demo mode.
Changes made to any parameters from the Waters Acquity UPLC Console will not be logged in the Chromeleon Audit Trail.
When you open the Console from a remote client PC, Chromeleon does not check if other users have opened the Console from the server PC at the same time.
To change the plate setup or other system configuration, open the Chromeleon Server Configuration, go to the Waters Acquity UPLC System properties, and click Configure Acquity system on the System Settings tab page. (If changes to the system configuration are made in the Acquity Console when launched from the Windows explorer or Chromeleon panel while the Acquity system is connected, Chromeleon will not recognize these changes.)
Blank Runs
Blank run samples require a Blank=Inject command in the PGM, which is automatically added. Blank=Skip is not supported. To prevent the sampler from injecting sample, on the General tab page for the sample manager in the Waters Method Editor, click Advanced, and then click the No Injection option.
Sample Overlap
If the Waters Method
Editor Load ahead function is
selected, sample overlap can be used within a sequence. This requires
that all samples in the sequence use the same method settings. If the
method settings are identical, the next sample can be loaded (prepared)
while the current sample is running. In the Browser, this sample has a
yellow background and the Preparing
status (see also ![]() Overlapping Samples). If the method
settings are not identical, the message "Sample with name <NAME>
will not be prepared due to incompatible methods. Samples are executed
sequentially." is displayed in the Audit Trail.
Overlapping Samples). If the method
settings are not identical, the message "Sample with name <NAME>
will not be prepared due to incompatible methods. Samples are executed
sequentially." is displayed in the Audit Trail.
The Audit Trail messages for sample preparation are displayed only in the currently running sample. Preparation steps will not be highlighted by a yellow background as usual.
Naming of Sample Positions (Acquity Sample Manager)
Sample position names for the Acquity Sample Manager are case sensitive. This means that, for example, position "1:a1" is not equal to "1:A1". If you manually enter a sample position in the sample list, make sure it matches one of the position names suggested by the Chromeleon driver. For an overview of suggested positions navigate to the Waters Acquity Control Panel. Press F8 to open the Commands dialog box. Select the Sampler.Position property. Click the arrow next to the Position list field. The drop-down list presents all allowed positions.
Missing Vials
A setting in the Sample Manger Preferences of the Waters Console defines how to handle missing vials. When you select Injection will fail on error, Chromeleon aborts the batch. When you select Injection will continue after warning, the injection will continue as usual, and a warning will be issued in the Audit Trail.
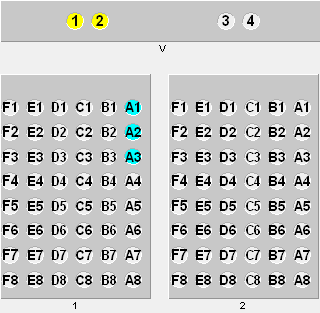
Rack Preview
Chromeleon allows you to view an illustration
of the rack ("Rack Preview") for a selected sequence and check
the Status of samples. The Rack Preview is available from the control
panel or in the Sequence Wizard (for details, see ![]() Rack Preview) and shows a preview
for standard vials (indicated "V") and the installed plates
(numbered "1", "2" etc.). The rack layout depends
on the sample manager type. To define a position, use V or plate number
followed by a colon and the position number. For example: V:1, ... V:4;
1:A1, 1:A2, .... 2:F8:
Rack Preview) and shows a preview
for standard vials (indicated "V") and the installed plates
(numbered "1", "2" etc.). The rack layout depends
on the sample manager type. To define a position, use V or plate number
followed by a colon and the position number. For example: V:1, ... V:4;
1:A1, 1:A2, .... 2:F8:
Column Manager
When the Advanced mode is selected on the tab page for the column manager in the Waters Method Editor software, note the following:
- The Advanced mode, which allows users to set up to six temperature channels and a preheater temperature for diagnostics as well as run time events is supported for the CM-A/CM-Aux Column Manager, but not for classic column managers (CM); however, the functions are always available in the Method Editor.
- Allow sufficient time for the column to equilibrate to the set temperature before starting an analysis. The system will not wait until the target temperature has been reached.
Error Handling
Each time the Waters Instrument Component Software reports an error, Chromeleon aborts the batch.
Changing the Pressure Unit
When changing the pressure unit using the Acquity console, make sure that the unit change is also applied to the System pressure unit option on the System Settings tab page in the Chromeleon Server Configuration. Otherwise, Chromeleon will output incorrect values, for example, for the degasser pressure.
Known Issues
When setting a program for the 2489 detector to Dual mode in the PGM Editor, the Waters method may show two different sampling rates for the two channels. The data recording for Channel B stops after half the run time. In this case, re-open the PGM editor, change a value, and save. Then retry.
When recording data from the Sample Pressure diagnostic channel, the recording starts with the start of the sample, not with the specified AcqOn time.
When recording 3D data fields with the Acquity PDA detector, the recorded 3D wavelength range does not always correspond exactly to the range specified in the method. The deviation can be +/- the selected resolution.
German regional settings only: In the Audit Trail, the time for time events of some Waters instruments, such as the 2998 PDA or Acquity FLR detectors, is not displayed correctly.
Acquity FLR Detector only
2D Channel Handling – Change of Data Unit
The Acquity FLR detector provides up to four 2D signals. You may select a data unit ("Emission" or "Energy") for the signals in the Waters instrument method. The respective channel data is then displayed in that unit in Chromeleon, for example, in the signal plot on the control panel. Note, however, that when you change the data unit in the PGM File, you have to select the corresponding channel(s) in the Chromeleon signal plot properties to view the data. This is because Chromeleon can only display the data for the data unit that is defined in the Waters instrument method.
Recording continuous emission spectra (3D mode)
The FLR delivers spectra continuously from the start to the end of data acquisition (approx 1 spectra every second) when 3D mode is used. In Chromeleon, these spectra will be stored as single spectra in a spectra library, with a maximum of 250 spectra per run (this corresponds to a data acquisition time of approx. 4 minutes). In order to store the spectra in the spectra library, you need to add the required scan commands to the program manually, or execute these commands manually from the Chromeleon control panel during the sample run.
To record emission spectra (3D mode)
When creating a program, go to the ACQ-FLR tab on the Waters Acquity System Driver, click 3D Mode and select the scan type and wavelengths.
Modify the PGM in the commands view: Manually add ScanStart command at the time you want to start storing emission scans. The driver will store all spectra after execution of this command until ScanEnd is executed. Add the ScanEnd command at the time you want to stop storing emission scans. As an alternative, add a ScanNow command to store a single spectrum following this command (no end command required).
![]() Notes:
Notes:
A ScanStart command must always be followed by a ScanEnd command before a new ScanStart command can be executed.
The last spectrum of a scan interval will not be stored if the duration for the scan exceeds the remaining scan time. It is therefore recommended to select a larger scan interval than required.
Chromeleon automatically saves the spectra to a Spectra Library named Acquity.LIB. The spectra library is saved in the associated sequence. To open a recorded spectrum, double-click the spectra library.
Spectrum Lambda-Lambda-Mode
Spectrum lampda-lampda-mode is not supported.
For installation details, refer to Hardware Installation
![]() Waters Acquity UPLC and UPlC H-Class System:
Installation
Waters Acquity UPLC and UPlC H-Class System:
Installation