Installing and Controlling Thermo
Scientific Devices
![]() Thermo Scientific TriPlus Autosampler: Clone Mode
Thermo Scientific TriPlus Autosampler: Clone Mode
The TriPlus autosampler supports dual operation allowing alternate injections into two GCs. The following accessories and settings are required:
What is required?
License: |
Two licenses Timebase Class 1 |
Connection: |
For more information refer to |
Hardware |
Two free RS232 ports are required for control |
Devices: |
One TriPlus autosampler (TriPlus AS version only) |
Installation in the Server Configuration
To install and configure the TriPlus AS for dual operation, follow the steps below:
Create two timebases, e.g., "GC_Main" and "GC_Virtual".
On each timebase, install a TriPlus autosampler and the required GC driver
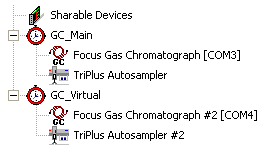
![]() Note:
Note:
In the example configuration above, timebases include identical GC types; however, you may also equip each timebase with a different GC type.
Specify, which autosampler is to be used as the secondary (virtual) device:
Open the General tab page of the TriPlus autosampler you want to operate as the virtual device and select the Virtual (Secondary) Device check box.
Verify that the Virtual (Secondary) Device check box is unchecked for the 'Main' autosampler to ensure that this device will automatically be handled by Chromeleon as the main device.
Make sure that the specified COM ports of the main and virtual instrument are connected correctly to their corresponding RS232-1 (Main) and RS232-2 (Virtual) ports at the rear panel of the autosampler.
Also ensure that the GC configured as 'Main' GC is connected to the 'Handshake Main' connector, and that the GC configured as 'Virtual' GC is connected to the 'Handshake Virtual' connector at the rear panel of the autosampler.
For more information also refer to the TriPlus Operating Manual.
For information about the configuration settings
on the other tab page, refer to ![]() Thermo Scientific TriPlus Autosampler:
Installation.
Thermo Scientific TriPlus Autosampler:
Installation.