Installing and Controlling Thermo
Scientific Devices
![]() ThermoQuest HS850 and HS2000 Headspace Autosamplers
ThermoQuest HS850 and HS2000 Headspace Autosamplers
Device Type: |
GC autosampler |
Device Driver: |
Thermo Scientific: HS850/HS2000 Headspace Autosampler |
Hardware Options |
Chromeleon supports control of the HS850 and HS2000 headspace autosamplers, consisting of a sampling unit and a control module. In addition, Chromeleon supports the following options:
The device driver was developed and tested with an HS2000 with firmware version 3.40. |
What is required?
License: |
Timebase Class 1 |
Connection: |
A free RS232 port and the following cables are required:
|
Thermo_HS850_2000.pan |
Hardware Installation
Device Connection: |
First, install Chromeleon software, and then connect the instrument to the RS232 port on the Chromeleon server PC. Also
refer to Use the special signal cable from Thermo to connect the GC output of the HS850 or HS2000 headspace autosampler to the TRACE GC (2000/Ultra), FOCUS, or Fisons 8000 GC. When connecting the headspace autosampler to GCs other than those mentioned above, connect the devices in such a way that these conditions are met:
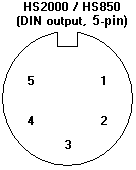
For information about the GC output on the headspace autosampler, refer to the picture below:
The autosampler receives a GC Ready signal when the signal between pins 1 and 2 is low. The GC receives a GC Start signal when the signal between pins 1 and 4 is high for about 1 second. |
Device Settings: |
On the autosampler's display, use START GC to set the time at which the autosampler is to send the start signal to the GC. Disable the autosampler's power failure
handling as described in the headspace autosampler manual. Use
the corresponding Chromeleon features, instead (see |
Software Installation
For details about how to add timebases and
device drivers to the Server Configuration, refer to ![]() Adding, Configuring or Deleting Devices.
When you add a driver to the timebase, the configuration dialog or wizard
opens automatically. For information about the settings, click the Help button on a page or press F1.
Adding, Configuring or Deleting Devices.
When you add a driver to the timebase, the configuration dialog or wizard
opens automatically. For information about the settings, click the Help button on a page or press F1.
When the injection is completed, the headspace autosampler sends a signal to the GC, which in turn sends a signal to Chromeleon.
Specify the remote input (GC_INJECTOR or GC_INJECTOR2) used by the headspace autosampler on the Options tab page in the Server Configuration. Under Inject response signal, select Use inject response signal from external source and select the remote input from the drop-down list. To do so, the GC must have been installed already.
Further Information
For detailed installation instructions, refer to the operating instructions for the instrument.
For an overview of the different Thermo Finnigan/ThermoQuest/TSP
instruments for which device drivers are available in Chromeleon, refer
to ![]() Thermo Scientific.
Thermo Scientific.