Installing and Controlling Third-Party
Devices
![]() Shimadzu GC-2010/2014 GC System
Shimadzu GC-2010/2014 GC System
Device Type: |
Gas chromatograph |
Device Driver: |
Shimadzu: GC-2010/2014 GC System
Includes Shimadzu GC-2010, GC-2010 Plus and GC-2014. |
Hardware
Options |
The GC-2010 and GC-2014 were tested
with firmware version 1.1150. Only 2 inlets are supported for the GC-2010. |
Restrictions: |
Chromeleon does not support dual injection. |
What is required?
License: |
Timebase Class 1 |
Connection: |
A free RS232 port and the following items are required:
|
To control the instrument, use
|
Hardware Installation
Device Connection: |
First, install Chromeleon software, and then connect the instrument to the RS232 port on the Chromeleon server PC. |
Device Settings (General): |
(Press [FUNC] on the device and go to GC Configuration - Transmission Parameter): Protocol: Level 3 Baud Rate: 115200
When using an injector, set the Number of Injection parameter on the device to '1'. This enables injector control in Chromeleon.
When using a subinjector, set the Use the Same Param parameter on the device to 'false'. This enables subinjector control in Chromeleon. |
Device Settings (Manual Injection):
|
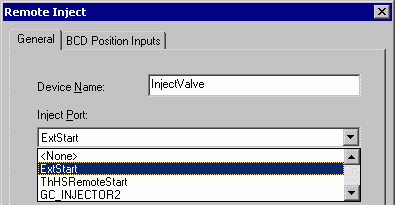
If you want to perform manual injections and generate an inject response using the Start button on the instrument's panel, a Remote Inject driver must be installed on the timebase: In the Server Configuration program, add a Remote Inject driver to the timebase. (Select Add Device on the Edit or context menu, and then select Generic from the Manufacturers list box and Remote Inject from the Devices list box.) On the General tab page, select ExtStart from the Inject Port list box:
Issue an Inject command to prepare for the manual injection: [] 18:00:34 0.000 InjectValve.Inject [Message] 18:00:34 0.000 {InjectValve} Waiting for inject response on ExtStart. [Message] 18:00:41 0.000 {InjectValve} Got inject response. |
Restrictions: |
It is not possible to control the GC via the UCI. |
Software Installation
In the Chromeleon Server
Configuration, add the driver to a timebase. For details, see ![]() Adding, Configuring or Deleting Devices.
After you add the driver, the configuration dialog opens automatically.
Adding, Configuring or Deleting Devices.
After you add the driver, the configuration dialog opens automatically.
On the General page, select the desired settings. For information about the settings on a page, click the Help button on a page or press F1. Finally, click the Retrieve configuration from instrument button. Information about the components installed in the GC is sent to Chromeleon and automatically entered in the following configuration pages. It is usually not required to modify the other configuration pages.
Troubleshooting
For successful control of the GC system by Chromeleon, make sure that:
The Time Program and Pre-Run Program (available by pressing the [FUNC] key on the GC) are empty, i.e., no steps are programmed. Otherwise, Chromeleon cannot control the system.
You have stored a backup of the settings for serial communication with Chromeleon elsewhere before executing the Initialize RAM and Initialize all commands (available by pressing the [FUNC] key on the GC and then Service/Maintenance -> Initialization), as any installation and configuration data, including the settings for serial communication with Chromeleon, is lost permanently when executing these commands.
For more information about troubleshooting and the above commands, refer to the operating instructions for the GC.
Further Information
For detailed installation instructions, refer to the operating instructions for the GC.
For an overview of the Shimadzu instruments
for which device drivers are available in Chromeleon, refer to ![]() Shimadzu.
Shimadzu.