Installing and Controlling Third-Party
Devices
![]() Gilson Sample Preparation Systems (Old Device Driver)
Gilson Sample Preparation Systems (Old Device Driver)
Dionex recommends to operate the Gilson Sample
Preparation Systems with the new Gilson
XL Series (Extended) device driver that is also used for operating
the Gilson autosamplers of the XL series (see ![]() Gilson XL Autosampler Series (221XL, 222
XL, 231XL to 233XL, ASPEC XL). If you use the old Gilson
231 XL Autosampler Device
Driver nevertheless, note the following requirements:
Gilson XL Autosampler Series (221XL, 222
XL, 231XL to 233XL, ASPEC XL). If you use the old Gilson
231 XL Autosampler Device
Driver nevertheless, note the following requirements:
System Requirements
Gilson |
|
|
|
|
|
|
|
|
|
|
|
|
|
Dionex |
|
|
|
|
Connecting the Sample Preparation System
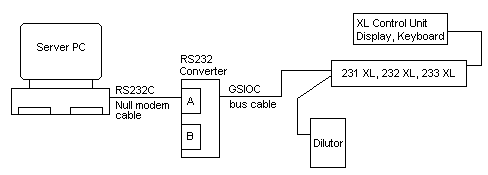
Connection Cable Converter Box (channel A) - COMx
GSIOC
Converter |
|
COMx |
COMx |
3 |
----------- |
2 |
3 |
2 |
----------- |
3 |
2 |
7 |
----------- |
7 |
5 |
|
|
Internal: 4 - 5 |
Internal: 7 - 8 |
Starting the Sample Preparation System
As soon as the sample preparation system has been connected as shown above, the software configuration of the system must be defined. To be on the safe side, you should make a backup copy of the Gilson system disk to your PC, using the DISKCOPY command.
Then insert the copied disk into the drive on the side of the control unit. Turn on all Gilson system components! The control unit loads the operating system and the device driver software GYNK_231 from the disk. After the usual prompts for the date and time, the program is in the main menu shown below.
----GILSON GYNK_231 3.15—Default.XCP----
231XL: 10/1230 RACKS:0 ZONES:0
DIL :
MP3 :
HPP :
M506: M606 :
---------NO PROGRAM------MEM:83416-------
FILE CONFIG EDITOR RUN MANUAL
In the title line, the name of the control software (GYNK_231) and the version number appears (version 3.15 or higher). The name of the currently used method file is also specified. This file contains all parameters. Below that, the screen lists all system components with their GSIOC addresses. In addition, you can see the number of the currently installed racks and zones.
Configuring the Sample Preparation System
Press the <CONFIG> function key to change from the main menu to the configuration menu.
----UNIT----Gynk_231/CONFIG--------------
XYZ-ROBOT 231B V1.11 to ID: 10
---------ADD-/DEL-UNIT = <ENTER> --------
ZDRIVE RINSE TRAY VALVES QUIT
For operation with Chromeleon, set up the IFACE 606 system component:
----CONFIG/=====UNIT====================
HPPUMP < free >
IFACE 506 < free >
IFACE 606 < free >
M819-No.1 < free >
M819-No.2 < free >
----ENTER===============================
INIT REMOVE QUIT
After you have pressed <Enter> and selected IFACE 606, using the arrow keys, the component is set up with INIT. Select the preset Unit-Id 61 by pressing the OK key. The following menu appears:
----CONFIG/UNITA/IFACE 606==============
========================================
CONFIG-A CONFIG-B CHAR QUIT
The "A" channel is the default in many communications routines. That is why communication should be configured via this channel. Use CONF-A to select the configuration screen for the "A" channel. Enter the values listed below:
----CONFIG/UNITA/IFACE 606/CONFIG-A=====
Baud rate : < 9600 >
Parity : NONE
Data bits : 8
Stop bits : 1
Handshake : NONE
===========INPUT: CURSOR <- / >========
RESET OK ABORT
Finally, check the settings of the communications protocol on the CHAR menu in CONFIG/UNITS/IFACE 606. It should appear as follows:
----CONFIG/UNITA/IFACE 606/CHAR=========
CH.A Char START : /
Char END : BSlsh
CH.B Char START : /
Char END : BSlsh
========SELECTION: CURSOR <- / >========
RESET OK ABORT
This completes the configuration of the IFACE 606. Quit the menu by selecting QUIT. Select QUIT again to complete the component configuration. You are prompted to save the changes.
The following screen appears:
----ABIMED GYNK_231 3.15==DEFAULT.XCP==
231XL: 10/1230 RACKS: 0 ZONES: 0
DIL : 0/1000
MP3 :
HPP :
M506 : M606: 61
=========NO PROGRAM===MEM: 80872========
FILE CONFIG EDITOR RUN MANUAL
Now, set up the sample tray types and the sample zones. Press the CONFIG key to return to the components previously set up.
----UNIT----Gynk_231/CONFIG--------------
XYZ-ROBOT 231B V1.11 to ID: 10
DILUTOR 1 402S V2.21 to ID: 0
INTERFACE 606 V1.0 to ID: 61
---------ADD-/DEL-UNIT = <ENTER> --------
ZDRIVE RINSE TRAY VALVES QUIT
After you have selected XYZ-ROBOT, further configuration is performed on the TRAY menu.
----Gynk_231/CONFIG/XYZ-ROBOT/TRAY------
=========================MEM: 79280 ====
RACKS ZONES CHECK QUIT
After the sample rack has been specified under RACKS, you can divide the rack in several ZONES. For example, for a rack of the type 0 with a capacity of 80 samples, the division could be as follows:
=T ZoneName ===Vials=== ? SUM Rack==
SAMPLE_A 1-40 P 40 1-1
RESULT_A 41 -80 P 40 1-1
===Racks:1===Vials:80===================
APPEND INSERT DELETE RUN-? QUIT
The Dionex device driver supports two standard zone names, SAMPLE_A, and RESULT_A. Other source zones cannot be used for sample extraction! This means that you have to place all inject samples of a batch run in one of the two sample zones!
The zones each contain 40 sample positions, numbered from 1 to 40 in a Sample file. In the above example, the sample 1 of the RESULT_A zone has the position 41. Of course, it is possible to set up and assign more zones on the rack (see the selection lists under APPEND or INSERT) to meet to individual requirements.
![]() Tips:
Tips:
Samples to inject must always be located in SAMPLE_A or RESULT_A. Set the ? parameter (see top line of display) to P. To do so, repeatedly press RUN-? until P appears on the display.
The corresponding Gilson method file indicates which source zone is used for the injection. For a description of the file's contents and significance, see below.
Also, specify the selected source zone in Chromeleon by setting the corresponding properties. The default setting is SAMPLE_A.
The configuration settings required for the operation by Chromeleon are now completed. After you have repeatedly pressed the QUIT key and saved the operation, the main screen appears again.
----ABIMED GYNK_231 3.15==DEFAULT.XCP==
231XL: 10/1230 RACKS: 1 ZONES: 2
DIL : 0/1000
MP3 :
HPP :
M506 : M606: 61
=======NO PROGRAM=====MEM: 78824========
FILE CONFIG EDITOR RUN MANUAL
Creating the Standard Task for Operating the Gilson Sample Preparation System with Chromeleon
The two required minimum tasks for operating the Gilson 231 XL Autosampler device driver are described below.
Program for Method Selection
To access various injection methods (sub programs) from Chromeleon, the following main program must be created. (For information about how to use the editor, refer to Gilson's operating instructions for the Xtray software)
=========GYNK_231-EDITOR================
1 DoMethod606
< PRG-End >
======================MEM: 77072========
CLIP INSERT DELETE PARAM QUIT
When inserting DoMethod606, you only need to set the communications channel in the 606 Interface. Press the CONFIG key and set the 606-Channel parameter to A.
The main program is responsible for starting one of a maximum of 10 possible injection methods. Chromeleon sends the name of a sub program to the main program. DoMethod606 loads the sub program that then controls sample processing. The sub program is active as long as the user explicitly selects another sample preparation method (sub program). Thus, the active sub program is interrupted. The sample preparation program returns to the DoMethod606 task and receives the name of the sample preparation method from Chromeleon. DoMethod606 is quit only after you have selected the Disconnect command in Chromeleon.
The main program consists of a DoMethod606 call. It is up to the user to start other tasks before and after DoMethod606. Verify that DoMethod606 is running while Chromeleon controls the sample preparation system.
The main program can be saved under any file name (extension XCP). Proceed as follows:
Select FILE on the Main menu and then select SAVE in the next menu that appears.
=============FILE:DEFAULT.XCP==========
for DoMethod-Tasks (.XSP-File)
Tasklist without configuration:
LOAD=<1> SAVE=<2> LIST=<3>
======================MEM: 78768========
LOAD SAVE LIST LOCK QUIT
![]() Caution:
Caution:
Use the SAVE (F3) function to save a main program (XCP file). Use the SAVE = <2> function (key 2) to generate "sub programs" with the extension XSP! See below for more information.
Injection Methods (Sub Programs)
In Chromeleon, the injection method is selected by a property. As soon as this property is set in a PGM File or Online, the DoMethod606 (in the main program) starts the corresponding sub program, the name of which must be 1.XSP, 2.XCP ... 10.XSP in the file directory of the sample preparation system!
The minimum sub program looks as follows:
=========GYNK_231-EDITOR================
1 SendConf606
2 BeginLoop
3 InjectK606 RESULT_A
4 EndLoop
< PRG-End >
======================MEM: 76536========
CLIP INSERT DELETE PARAM QUIT
It consists of two further tasks:
At the beginning of the sub program, the SendConfig606 task sends the parameter limits for the currently used sample preparation system to Chromeleon. That is why Chromeleon can check the limits for the sample position and the injection volume.
The InjectK606 task appears within the <BeginLoop 1> ..... <EndLoop> loop. It receives the sample position and the injection volume from Chromeleon. The loop is passed until the user replaces the old sub program by loading the new injection method.
To create a sub-program, follow the steps below:
Start the editor.
Delete the existing program.
Insert the SendConf606 task. Set the 606-Channel parameter to A.
Insert BeginLoop.
Insert the InjectK606 task. Set the parameters of this task on the following screen.
=========Task-3/InjectK606/PARAM========
========================================
TCONF INJPAR1 INJPAR2 >PAR2 QUIT
Set the following parameters:
TCONF ‘Sourcezone’ to |
‘SAMPLE_A’ |
or |
|
‘RESULT_A’ |
|
INJPAR1 ‘606-Channel' to |
‘A’ |
|
‘Command - Echo’ to |
‘AN’ |
|
To configure the other parameters follow the description in the documentation for the Gilson Sample Preparation System Software.
Insert EndLoop
Before InjectK606, the user can insert any tasks for sample preparation in the Begin... End loop. The InjectK606 task can be included only once in the loop.
When you close the editor, you are prompted to save the changes immediately. Select Do not save. Otherwise, the "main program" will be overwritten. To save the "sub-program", select the corresponding command on the File menu.
=============FILE:DEFAULT.XCP==========
for DoMethod-Tasks (.XSP-File)
Task list without configuration:
LOAD=<1> SAVE=<2> LIST=<3>
======================MEM: 78768========
LOAD SAVE LIST LOCK QUIT
Press the <2> key, and then select New to save the "sub-program" under a new name (1.XSP to 10.XSP).
For information about the different loading and saving functions of the main and sub tasks, refer to the following paragraph.
Notes on Using the Editor of the Sample Preparation System
Before its extension for Chromeleon, the sample preparation system recognized only task files with the XCP extension. With the introduction of sub programs, there are now XSP files the names of which are not correctly displayed in the title lines of the menu displays. After loading an XSP2 File on the File menu (function 1), it is no longer possible to determine the name of the file currently in the editor, as the name of the XCP file that was loaded last is displayed. Thus, it is necessary to consider the file type of the file that was opened last. Otherwise, saving a file may generate (not serious) or overwrite (serious) a file of another type!
Notes for Operation with Chromeleon
Before you start Chromeleon, enable the main task on the Sample Preparation System.
Starting the Main Task
Follow the steps below:
Select Load on the File menu to load the main task.
Click Quit to return to the main menu. Click Run.
Confirm all following prompts by <ENTER>.
Click Ok. The program should now be ready to start. Decide whether to enable the audit of the sample preparation system or not.
Click Start to start the program. On the display, the prompt of the method file name appears through the Method606 task.
The sample preparation system is ready to receive the method name and other commands via the RS-232 interface from the Chromeleon PC.
![]() Tip:
Tip:
For more installation details, refer to the manual for the instrument.
For an overview of the different Gilson instruments
for which device drivers are available in Chromeleon, refer to ![]() Gilson.
Gilson.