Installing Dionex Devices
![]() Switchos Capillary/Nano HPLC Switching Device: Installation
Switchos Capillary/Nano HPLC Switching Device: Installation
|
Device Type: |
Capillary/nano HPLC valve-switching unit |
|
Device Driver: |
Dionex LC Packings Capillary/Nano LC Modules: Switchos II SSV for controlling the switching valves and |
|
Hardware Options |
|
What is required?
|
License: |
Timebase Class 1 |
|
Connection: |
The Switchos Switching Device is usually installed with an UltiMate system. In addition to the list of cables required for the UltiMate system, one additional free RS232 port and the following cables are required:
To install the Switchos Switching Device for stand-alone operation, two free RS232 ports and the following cables are required:
|
|
To control the instrument, use a suitable panel from the |
Hardware Installation
First, install the Chromeleon software, and then connect the instrument to the RS232 port on the Chromeleon server PC.
Also refer to ![]() Connecting Devices via RS232.
Connecting Devices via RS232.
RS-232 ports (valve-switching unit)
Use the Solvent Organizer Cable to connect the COMMUNICATION Connector port on the valve-switching unit to your PC.
RS-232 ports (pump)
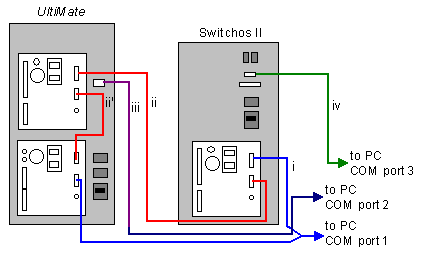
An UltiMate system is connected to the Switchos device:
The two serial R-232 interfaces enable digital data transfer between the Switchos loading pump, the UltiMate micropump, the UltiMate UV detector, and the PC. These devices communicate with each other on an integrated network. The following RS232 connections are required (Note: The picture also describes RS232 control of the switching valves (iv)):

a) Connect the RS232 1 port on the Switchos pump and the
RS232 2 port on the UltiMate detector to the PC, using the Y Shape Cable (see cable i in the picture).
b) Connect the RS232 2 port on the Switchos pump and the
RS232 1 port on the UltiMate pump, using a Modem Cable (see cable ii in the picture).
c) Connect the RS232 2 port on the UltiMate pump and the
RS232 1 port on the detector, using another modem cable (see cable ii' in the picture).
d) Use the Solvent-Organizer Cable to connect the Communication Solvent Organizer port on the UltiMate to a free COM port on the PC (iii).
Stand-alone control of the Switchos device (without UltiMate):
Connect the RS232 1 and the RS232 2 ports on the Switchos system to the PC, using the Y Shape Cable.
Device Settings:
Set the Remote/Local switch on the top right of the instrument's rear panel to the center position. Chromeleon can only control the Switchos Switching Device if the switch is set to this position.
Make sure that the pump's settings are as follows: Control: NET and Baud Rate: 9600 (for more information, refer to the Switchos User's Manual).
Software Installation
First, add the UltiMate/Switchos System driver to the timebase to install the UltiMate system and the Switchos pump, and make the necessary settings. Then add the Switchos II SSV driver to install the Switchos valves, and make the necessary settings.
For details about how to add timebases and device drivers to the Server Configuration, refer to ![]() Adding, Configuring or Deleting Devices. When you add a driver to the timebase, the configuration dialog or wizard opens automatically. For information about the settings, click the Help button on a page or press F1.
Adding, Configuring or Deleting Devices. When you add a driver to the timebase, the configuration dialog or wizard opens automatically. For information about the settings, click the Help button on a page or press F1.
Further Information
For detailed installation instructions, refer to the operating instructions for the instrument.
For an overview of the switching device, refer to ![]() Switchos Capillary/Nano HPLC Switching Device: Overview.
Switchos Capillary/Nano HPLC Switching Device: Overview.
For an overview of the different Dionex devices, refer to ![]() Installing Dionex Devices.
Installing Dionex Devices.